
Why use branching paths in teaching?
Studies show that well-designed branching case studies expose learners to a variety situations and outcomes allowing learners to hone their reasoning skills. Simulations stimulate active learning, allow opportunities for consistent expert feedback, and provide a safe environment for the participant to learn from their mistakes.
Authoring case studies requires a different skill set than developing a lecture. This guide, adapted from Designing Developing and Implementing Branched-Narrative Virtual Patients for Medical Education, Training and Assessment (J.B. McGee, 2011), is intended to assist educators in authoring case studies in support of e-learning courses.
In its most basic form, a branched learning path contains the follow elements shown in the diagram below. Using this model, an author can develop an interactive experience with multiple choices and their associated outcomes and feedback.
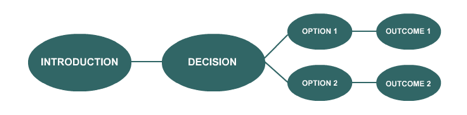
A typical case begins with an introduction to the scenario followed by decision points to collect data, make informed decisions and take action. The results of the learner’s decisions are reflected as the case unfolds in the form of data findings and investigative results.
Steps for authoring branching simulations
There are 5 key steps involved in authoring a branching path. We’ve outlined the best practices for each step to ensure your learning paths are well designed and effective.
Step 1: Getting Started
Understand the basic structure of a branching path and how branching paths can be used to support teaching.
Step 2: Laying Groundwork
Learning Objectives Like all effective educational programs, begin authoring your case with a clear definition of the learning objectives. A common mistake is to begin by writing the narrative. But taking the time to define the desired learning outcomes will pay dividends later in the authoring process. Ask critical questions like “What educational problem am I solving?” “What behaviors need to change?” “What skills do I want to teach?” Keep in mind that well-written learning objectives are explicit, action-oriented, and measurable.
Identifying the learner’s role Branching paths can put the learner in a variety of roles. Commonly, the learner plays the protagonist in the simulation. However, the learning objectives may call for a role reversal, with the learner playing another role in order to develop empathy or gain an alternate perspective.
What is the learner expected to do in the simulation? Take the time to define what the learner is expected to do in your branching simulation.
Define the length of the case Mini-cases can incorporated throughout learning modules to contextualize didactic information. Mini-cases are typically short 5-10 minute cases with a minimal amount of branching decision points, to reduce complexity. In contrast, summative cases can be utilized at the end of modules to provide learners with the opportunity to integrate concepts and refine critical thinking skills. Summative cases generally have more branching choices and are designed for learners to complete over the span of about 20 minutes. When defining the length and complexity of the case, keep in mind the overarching teaching function your case will serve.
Write a short case narrative The final step in laying the groundwork for your simulation is to write a short case narrative. The key to a successful case simulation is to tell a good story. Learners respond to compelling and engaging stories. Memorable characters, unique settings, unexpected events, and clever twists in the plot all add to the level of learner engagement and retention of subject matter.
Your case “story” should always have a beginning, middle, and an end.
The beginning sets the scene, develops the characters and sets up the ground rules. The middle develops the “conflict” that relates to the problem at hand. The end resolves the conflict by revealing the ideal choices and outcomes to the learner.
Assessment Explain how you would like the learner’s performance to be assessed within your branching simulation. Will the learner be scored based on making ideal decisions, economic impact, or some other metric?
Step 3: Mapping the Case
In the next stage of development, the author begins to construct the actual case itself. This is a multi-step authoring process, in which the following information is captured:
Set the rules and expectations As you begin to write the storyline, begin by explaining to the learner things like what role the learner is playing and what the learner is expected to do in the simulation.
Define the critical path When defining the sequence of decisions presented within your case, first define the critical path. The critical path defines the ideal storyline where the learner makes all the RIGHT decisions from beginning to end and the best possible outcome is achieved. A step is used to represent each decision point along a branched path. Each step will include a narrative with background information, a decision, and a set of options for learners to select from in order to advance to the next stage of the narrative.
Add branches Branches in the case take place at the primary decision-making steps and should correlate with case’s learning objectives. These steps are challenge points where learning tension occurs. When constructed properly, these decision points should cause learners to pause and think critically and deeply before making a choice. The effectiveness of the simulation is highly dependent on the appropriateness of these branched decision points.
Step 4: Building the Case
Complete the narrative and clinical data Once the critical path and branches are in place, fill in the missing details. This includes rounding out the storyline and adding any data associated with each step (e.g. videos, audio files, documents, etc.).
Add feedback and consequences There are many ways to provide feedback to the learner during and at the end of the simulation. Authors can provide comments that serve to mentor learners at each decision point of the case and/or at the end of the simulation. Feedback can also include outcomes or consequences.
Add data and other media Images, audio, video and other forms of media enhance the learner’s experience. Static media can be helpful in setting the scene of the case, while data files are valuable for challenging the learner to interpret information in order to make a decision on what to do next. Authors may not have all these files on hand however, any existing files can be uploaded into the media manager at this time and notes can be made to indicate any additional files that will be required.
Step 5: Preview and Implementation
At the end of the authoring process, the author can test the case using the PREVIEW feature. Authors may also wish to test the function of a case from the perspective of the user at various stages during the development process. The PREVIEW feature allows a real time testing of the logic, function, and flow of your learning path. Keep in mind that, depending on how the case is eventually implemented into the e-learning course, the learner may view the case in a slightly different manner. However, regardless of the delivery platform, the function of the case will remain the same.